- Home
- >
- Mobile apps development
- >
- How To Learn Android Programming – Step By Step in 2023
If you are a newbie who is stepping into the world of programming, learning how to develop a basic Android app might be one of the targets that every beginner aims at. Congratulation! You find the right place to get a comprehensive guidelines on how to learn Android Programming.
From this guideline, you will not just learn Android programming step by step but will also be able to develop your first Android app and find yourself at a moderate level of Android programming expertise.
Feel excited already? Let’s dive right into the blog post!
What is Android?
Android is an open-source and Linux-based OS for mobile devices like smartphones and tablets. This operating system was introduced by Google in November 2007.
With 15 years of operation, currently, Android has approximately 3 billion active smart devices that are Android-based worldwide.
In fact, there’s no need to say that Android is here to stay for years to come and this operating system will grow even further with the regular updates from Google.
Understanding the importance of Android and the huge benefits it brings to users, let’s get started to learn more about it.
Skills required to become an Android Developer
- Knowledge of SQL and XML
- Expertise in Java or Kotlin or both
- Android Software Development Kit (SDK) and Android Studio
- Databases and APIs
- Working on app functionality and UI
- Executing unit tests
- Fixing bugs and errors
- Knowledge of Git
Learn Android App Programming
1. Have a detailed overview of the official Android website
Check the official website of Android Development. Honestly, it is so essential to learn about the entire website to analyze the layout and a multitude of ideas, suggestions, and technologies relevant to Android.
It is not one of the mandatory tasks to become an Android developer, but you’re going to have a better insight into Android Development and its concepts.
2. Start learning Kotlin
Google has officially supported Kotlin on Android as a “first-class” language since May 2017. Fewer businesses are designing commercial applications using Java only, so learning Kotlin is a required move to be a good Android developer.
You can use the documentation for Android development on the official Kotlin website and learn the language online. This is a significant step on the path to becoming an Android developer.

3. Explore Material Design
You can go through the entire site to see how the material design is developed and the underlying reasons. Material is a Google design system developed to enable teams to produce high-quality and efficient apps for Android, iOS, Flutter, and the Web.
The system frees developers and designers from tedious collaboration processes to quickly build beauty products. Material design provides developers with rich-cue features and natural motions that mimic real-world objects.
4. Install Android Studio IDE
Android Studio is the Official Integrated Development Environment (IDE) for Android app development.
It is centered on the IntelliJ IDEA, an integrated Java software development environment, and integrates its code editing and developer tools. Install Android Studio on your system and start practicing code while designing basic apps on it.
5. Build your first Android app
Start with learning Android and how to build and run an Android Studio “Hello, World!” project.
You will then establish a new interface for the app that will accept the input from the user and move to a new display in the app to present it.
Before you get started, there are two primary components that you need to learn about Android apps: how they have multiple points of entry, and how they are adaptable to various devices.
6. Create your first Android project
To help you get started, we have compiled easy to follow steps to run your first ever Android project:
- Install the latest version of Android Studio.
- Click on “Create New Project” when you see the “Welcome to Android Studio” screen. (Go to File > New > New Project if you have already had a project opened).
- Select “Empty Activity”, click “Next” on the “Select a Project Template” screen.
- Now, go to “Configure your project” and perform the following steps:
- Write “My First Android App” in the Name field.
- Enter “com.example.myfirstapp” in the Package name field.
- Change the save location folder if you want.
- Choose between Java or Kotlin as your preferred language.
- Select the lowest version of Android your app will support in the Minimum SDK field.
5. Click Finish once you are done and satisfied with the options you selected.
Wait for some time for this window to appear on the screen.
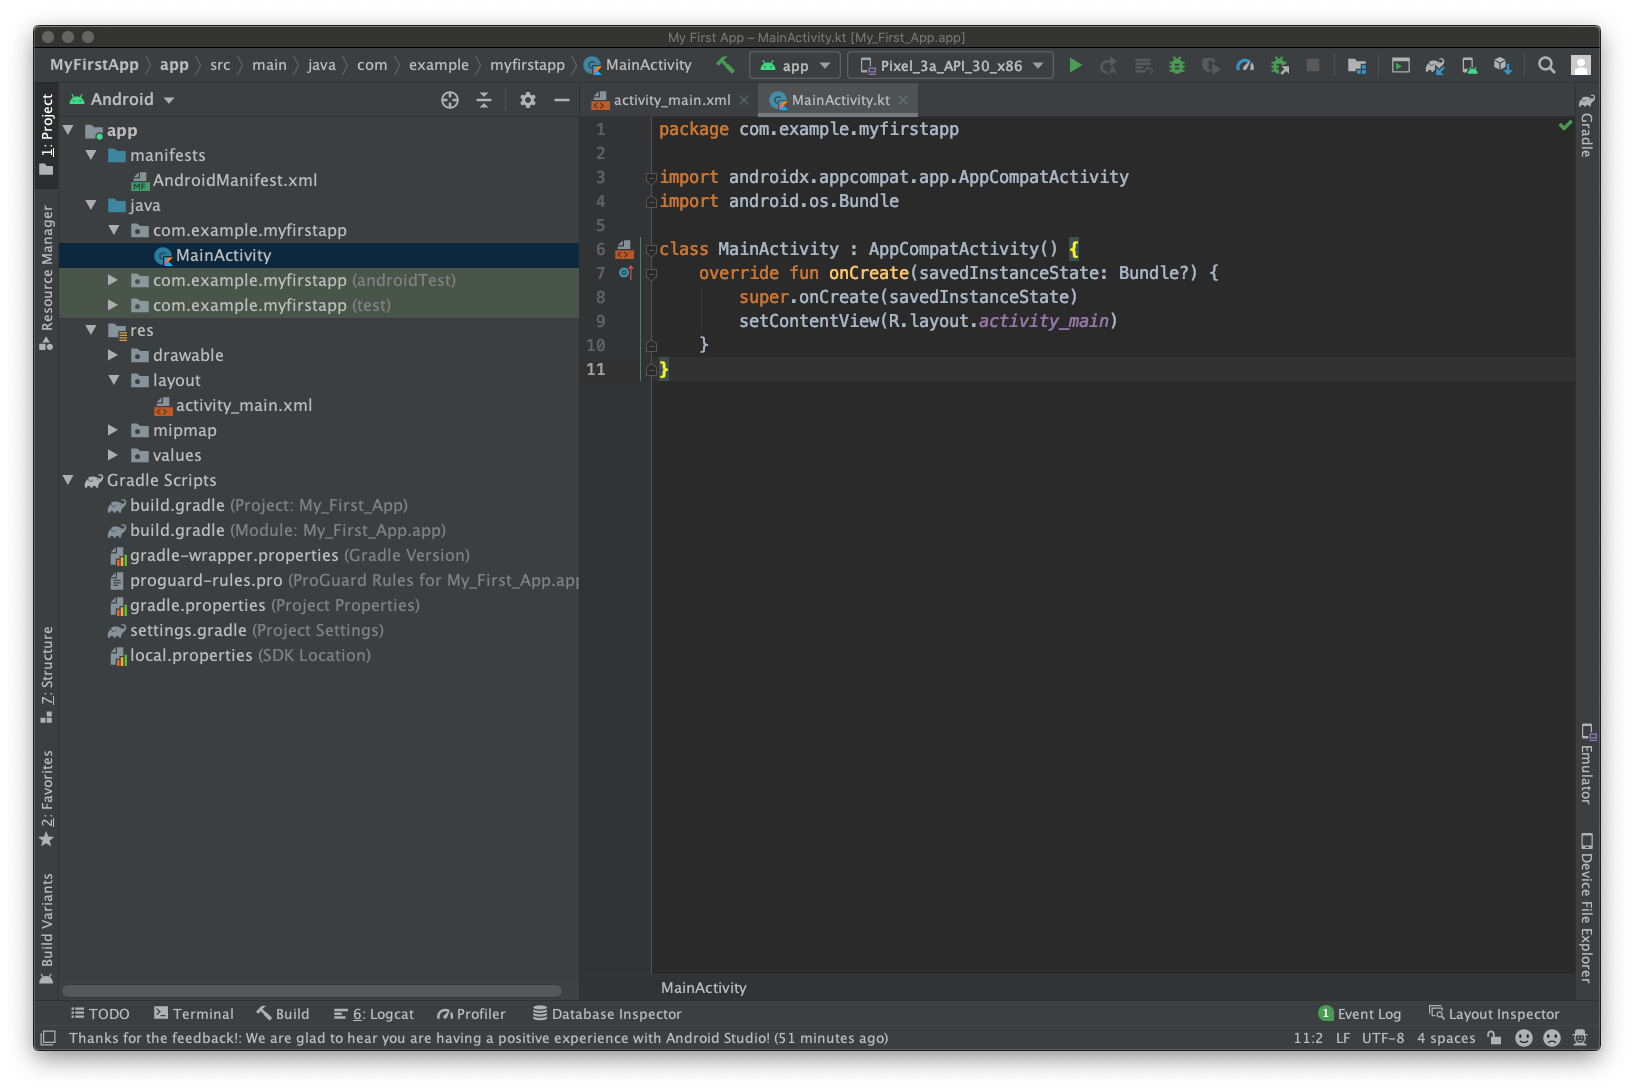
Open the project screen (View > Tool Windows > Project) and select the Android View. Now, you may be able to see the following:
app > java > com.example.myfirstapp > MainActivity
When you develop and execute your app, the system launches an instance of this Activity and loads its layout.
app > res > layout > activity_main.xm
This XML file will be defining the layout for the activity’s user interface (UI). It has a TextView element with the text “Hello, World!”
app > manifests > AndroidManifest.xml
The manifest file explains the basic attributes of the app and defines each of its components.
Gradle Scripts > build.gradle
There are 2 files with this name: one for the project, “Project: My_First_App,” and one for the app module, “Module: My_First_App.app.” Each module has its own build. gradle file, but this project currently has just one module. Use each module’s build.gradle file to control how the Gradle plugin creates your app.
7. Run your app on a real device or an emulator
Now that you have created your first project and are all done and dusted with the coding part, it’s time to run the project and see if it works or not. Let us follow the steps mentioned below to see how you can run your first-ever Android project:
Running your Android App on a real device:
- Connect your device to your system with a USB cable. Install the compatible USB Driver if you are using windows.
- Go to the Developer Options and enable USB debugging after performing the following steps:
- Go to the Settings app.
- If your device uses Android v8.0 or higher, select System. Otherwise, go to the next step.
- Scroll to the bottom and select About phone.
- Scroll to the bottom and tap the Build number seven times.
- Return to the previous screen, scroll to the bottom, and tap Developer options.
- In the Developer options window, scroll down to find and enable USB debugging.
- In Android Studio, choose your app from the toolbar’s run/debug configurations drop-down menu.
- In the toolbar, select the device that you wish to run your app on from the target device drop-down menu.
- Finally, click on the Run option and you will be able to see “Hello, World!” displayed in the app on your device.
Running your Android App on an emulator
You can choose from the many top emulators available in the market. However, installing the emulator can be a task, for which you can follow the steps mentioned below:
- In Android Studio, establish an Android Virtual Device (AVD) that the emulator can use to install and run your app.
- In the toolbar, select your app from the run/debug configurations drop-down menu.
- From the target device drop-down menu, select the AVD that you want to run your app on.
- Click Run. Android Studio installs the app on the AVD and starts the emulator. You now see “Hello, World!” displayed in the app.
Summary: Steps to Learn Android Programming
Step 1: Grasp the fundamentals of Java programming. The basics of the Java programming language are a must for Android development. Java expertise is needed to make the most out of Kotlin.
Step 2: Start learning Kotlin’s programming language a bit. As Kotlin is formally the first-class language for Android app development, learning Kotlin is very essential and will come in handy. Then put a little more focus on the advanced features of Java & Kotlin.
Step 3: Next, try to get an idea of some of the important Android applications like Handler Looper, Context, etc.
Step 4: Learn the basics of SQLite Databases and the design of database schema. Having to design a database appropriately is essential for any Android developer.
Step 5: Acquire knowledge of Networking, GET, and POST requests. You should be able to implement caching effectively for your app to run smoothly while consuming lesser data.
Step 6: Practice debugging in your spare time. The more you debug, the better you will become.
Step 7: For a fast and smooth-running app, you must have sufficient knowledge of garbage collection and memory leaks.
Step 8: Get your hands on data structure concepts and understand how optimization works. Apply your learning to enhance the rendering speed of UI.
Step 9: In order to write code faster, you should also overview the architectures like MVP, MVVM, etc, and unit testing and frameworks like Dagger, and RxJava.
Step 10: In this final stage, you’re advised to try to gather more and more information about 3rd party libraries. Try to gather more and more information about 3rd party libraries.
Read more: How to develop Android app with Python – Best tools and IDES recommendation
Closing thoughts
To Learn Android Programming Step By Step and ace Android Interviews, you must also remain consistent all the time while learning the concepts and practicing the code.
If you’ve already familiar with the basic knowledge, it could be said that you now ready to dig deeper.
At this stage, Google Android documentation will come in handy, which is helpful material that is easy to understand for Android programming learners like you.
So, go through their documents on various subjects, download the sample codes, and run them on your own PC. Go through the code and try to comprehend how things work.
Once all of that is done and dusted, you should be able to install Android Studio and run your very own projects.
If your business needs a mobile app but and is looking out to hire a well-versed Android Developer, get in touch with InApps to connect with top-notch professional Android developers.
About InApps:
With InApps, you can save thousands of dollars (reduce up to 70% of IT cost or only from $20,000 to $40,000/project). We offer full services with:
- Transparent cost and commitment.
- Free consultation and completed proposal.
- Free design mobile application concept.
We’re proud to be a reputable partner who’ve provided mobility solutions, mobile app design and development for +60 international startups, SMEs & enterprises from many industries namely heallthcare, dating, gaming, payment, Food & Restaurant,…
Reliability is one of the elements to make the best decision! Hence, we shall show you our reputation via our case studies.
[sociallocker id=”2721″]
List of Keywords users find our article on Google:
| android studio tutorial 2022 |
| android tutorial 2022 |
| android studio tutorial java 2022 |
| best way to learn android development 2022 |
| android programming |
| android studio 2022 tutorial |
| how to become android developer |
| android studio for beginners tutorial |
| learn java for android |
| learn android |
| android development tutorial |
| how to program android apps |
| android developer tutorial |
| learn java for android development |
| android app development tutorial |
| best way to learn android programming |
| best website to learn android programming |
| learnandroid.net |
| learn java for android studio |
| programming on android |
| learn android online |
| programming android |
| is it easy to learn android programming |
| android tutorial for beginners |
| best site to learn android app development for free |
| how to start programming android apps |
| how to learn java for android development |
| how to become a android developer |
| how to program android |
| android coding |
| programming for android |
| android studio getting started |
| learn android development fast |
| android programming tutorial |
| how to program for android |
| learning android development 2022 |
| best way to learn android development |
| learn android programming |
| programming in android |
| best way to learn android |
| android learn |
| android mobile programming |
| android java programming |
| java programming for android |
[/sociallocker]
Let’s create the next big thing together!
Coming together is a beginning. Keeping together is progress. Working together is success.


